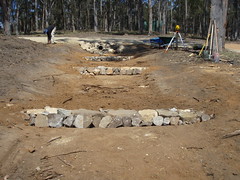
At the top of the picture is me (Jesse). To the right of me is a culvert that runs under the main driveway. In a heavy storm a significant amount of rain water can be expect to coming rushing out of that culvert.
The assembly of small rock walls coming to the foreground is a gabion system that Tanya and I designed and constructed using rocks from the site.
Without the gabions, water would likely rush down hill causing erosion and damage to the surrounding area. With the gabions in place water is slowed and soaked into the soil giving us an opportunity to assemble a productive ecosystem of useful plants.
Gabions first slow the water down and secondly collect sediment and other materials behind them. The top edge of the gabion is roughly level from end to end, pacifiying the flow of water down hill. As material builds up behind the gabion, a level area of moist soil is built up. This becomes an excellent area for growing plants.
Gabions are a desing feature often used in deserts, fequently measureing meters in height. In this case a smaller scaled down version is most appropriate.
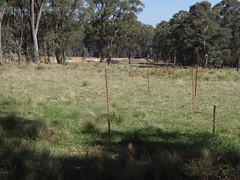
Little more than sticks in the ground these are the survey markers of a swale that Tanya, Fredrik and I have designed here at River Tree. It follows a contour line from the bottom of the gabion system over 200m to the edge of the property.
A swale is an on contour water harvesting foresty system. Swales intercept and hold water running down slope. Once in a swale water has an opportunity to soak into the soil and move into the root zones of the plants in the swale mound and in pastures below.
This is Tanya using the laser level to check that the swale is not falling or rising too much. Differnces off dead level within 20mm or so are acceptable. This kind of variation will self level over time.
The laser level is a great tool, as it requires only one person to use efficiently. However, the laser level is battery operated and cannot be looked through like a dumpy (transit) level.
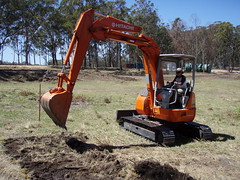
After she has checked her work it's back on the machine to further demonstrate her proficiency.
Lucky me, taking this picture from the machine, as Tanya toils away to fix my mistakes. A professional operator would do such an accurate job that this hand work leveling would not be required.
The gap in the swale mound (center of picture) is the level sill spill way for our swale. This is a very important feature of any swale and must be constructed with great care. As Tanya, Fedrik and I are all new at operating the machine, we opted to use hand tools for this job. The edge of the level sill was set at 10 cm above the bottom of the swale, using the laser level. This means that the swale will fill, to a depth of 10cm along its entire 200 meters, before the excess spills over the level sill. When the water does spill over it will do so evenly without causing much erosion or damage to the slope below.
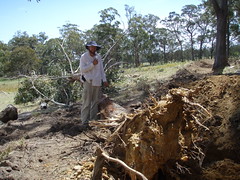
Unfornuately a medium sized tree had to be removed, as it was growing on the conture line of the swale. This was my first time taking down a tree with the machine and I did it safely. The useable parts of the tree will be milled into fence posts, and the remainder will be fuel and mulch wood.
There's me, taking a break on the batter (up slope edge) of the swale. This part of the swale is usually graded at 2:1. We did this work by hand, hence the resting. Across the bottom of the swale is dead level and is flexible in its width. We designed this one to be used as a track for an ATV or small tractor. The wider the swale the more water it can hold. The bottom of the swale can become quite compacted over time. The hump of the swale is made of the material removed from the slope in creating the level track. The size of the mound is dependent on the slope of the hill and the width of the swale. A swale mound is never compacted, hooved animals and machines must never be allowed onto a swale mound or it will not be able to soak up water. Planting is also another important aspect of a swale. In the application of permaculture design a swale will have trees planted in the mound.
For now we have seeded this swale heavily with 5 different legume seeds: clover, lucerne (alf alfa), vetch, peas, and lupin. We made sure that all seeds were innoculated with the appropriate nitrogen fixing bacteria and then they were well raked in. Its an experiment! In about a months time we will begin to plant trees into the swale mound. We do not have the trees, or we would have planted now.
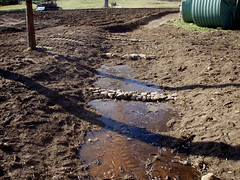
Fortunately for us, we have access to water that can be used to flood our swale. A dam on the property is going to be cleaned out and the water level must be lowered. Rather than wasting the water we can pump it up hill to the culvert above the gabion system and use it to flood the swale. This picture shows the water moving down the gabion towards the swale in the back ground. In most situations we would have to wait for rain to soak the swale. By pumping water now, we can help to germinate all the seeds we have put on the swale and prepare it for trees in the coming weeks.
After the water has moved through the gabion system it enters the swale. Remember that a swale is on level. The water moves along the swale realatively harmlessly, like a spilt drink across a table, spreading equally in all directions. Erosion is not a concern in a swale. The only time a swale can be damaged is if it overflows its bank. That won't happen to ours, because we did such a good job on the level sill spill way. That's Fredrik in the picture looking quite proud of the job we have done. We all watch the water move along the swale until the sun went down.
There it is, our first swale seeded flooded and ready for action! All we need now is some rain and we won't require the pumped water any more. Notice in the middle of the picture that water has already saturated the swale mound and is now leaking through onto the grass down slope. Unfortunately this area is badly compacted and the water is not saoking as it should. Once we have the right equipment we will deep rip this area. Deep ripping opens compacted land and the water that soaks through the swale will move into the soil and not run across the surface. The best place to have water on a farm is the root zone of the plants!


Will run-away climate change make drought permanent?
18 years ago