Friday, November 2, 2007

Garden Construction

It is one thing to grow a small veggy patch out the front door of a rental house add a bit of mulch, some manure, a few plants, seeds, water and enjoy. The evolution of a large permanent garden is a whole other exercise in muscles, machines (if you have them), planning and time. The garden at the Rivertree homestead is located approximately six meters to the down slope side of the swale( that was established several weeks ago). The hope is that the garden will benefit from being on the down slope of the swale. This is an account of the design and implementation of the Rivertree veggy garden.

Garden location
Originally uploaded by tlbaraka

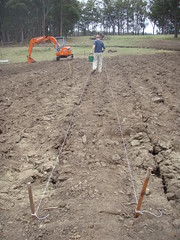
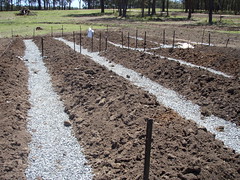
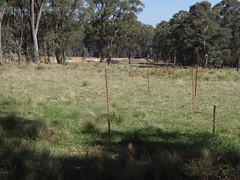
The line of string on the right indicates the placement of a future fence to keep out the local rabbit and Kangaroo/Wallaby population. Using a laser level it is pegged to the natural contour of the land the remainder of the garden was designed square to this line. The garden covers an area of approximately 240 square meters, of which 70 are dedicated to pathways.


Lining up pathways
Originally uploaded by tlbaraka
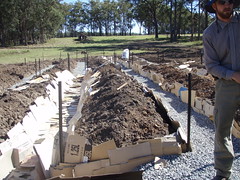
First, a string was placed to mark the edges of a pathway. In the proccess of this type of garden construction, material is removed from between the two lines and placed on either side to form the raised beds. Second, there is an application of blood and bone meal fertilizer that provides a young garden with vital nutrients and helps kick start soil biology. It is applied before the beds are dug, and is incorported as the digging takes place.


Tools of the trade
Originally uploaded by tlbaraka
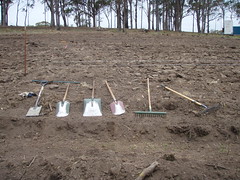
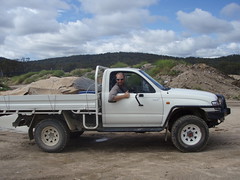
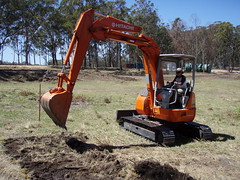
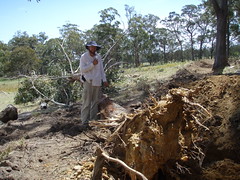
These tools would find themselves permanently glued to our hands for many days. We did use the excavator to do the bulky rough work, but the majority of the effort was spent on more deatailed work that only hand tools could do. When we started, Jesse and I did not fully realize how much we were in for physically.


Jesse digging paths
Originally uploaded by tlbaraka
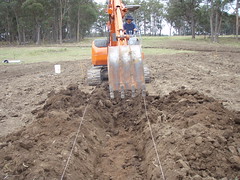
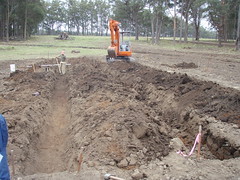
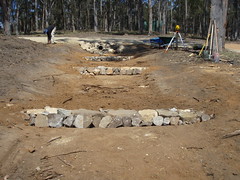
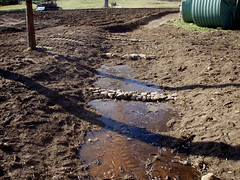
The initial dig, with the excavator, is to an average depth of .5m. On either side of the trench the beds begin to form with the excess material. As with most water efficient design, it is important to keep pathways and beds dead level. We should have been checking the trench for level as we went along but we didn't. The paths were dug to a consistent average depth, but they were not marked on contour and therefore it produced a 20cm difference in elevation from one end of the garden to the other. With that much elevation change in the pathways water will collect at the low end creating a soggy area and at the high end the garden beds would be dry making it difficult to water consitently. Obviously this was a really big mistake and by the time we had noticed all the trenches had been dug.


Leveling off and measuring path
Originally uploaded by tlbaraka
We have a bit of a melt down at this point, because we have recognized our mistake and we are already very tired. In order to correct the problem we had to move around a lot of extra material by hand meaning the lessons of this experience will not soon be forgotten.


Tip
Originally uploaded by tlbaraka
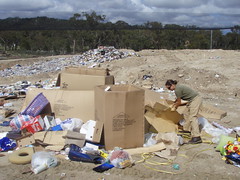
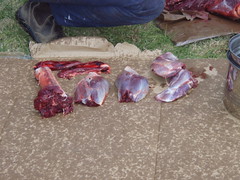
To lift our spirits we went to the Tip and did some garbage picking. Notice the giant bird net in the background. We were on a hunt for cardboard and other resources to be rescued from the Tip and used to help create a bountiful garden.


Our haul
Originally uploaded by tlbaraka
This is the first time in our lives we went home from the garbage dump with more than when we arrived.


Crushed limestone
Originally uploaded by tlbaraka
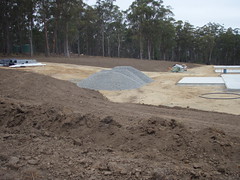
In the distance rests 30 cubic meters of crushed limestone. Behind the photographer is the garden for which it was destine.


Gravel and cardboard
Originally uploaded by tlbaraka
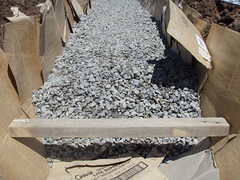
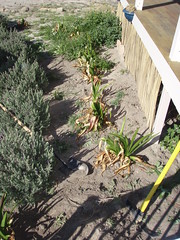
The paths were lined with a thick layer of cardboard and filled with the crushed limestone hauled wheelbarrow by wheelbarrow up the hill. The gravel filled pathways will function as both drainage and water catchment systems. In theory, these beds will be both moist and well drained using this pathway design.


Path construction
Originally uploaded by tlbaraka
As the pathways were filled, a width of .80m was maintained using a measured length of wood, and the laser was used to ensure that dead level was maintained.


Soil over cardboard
Originally uploaded by tlbaraka
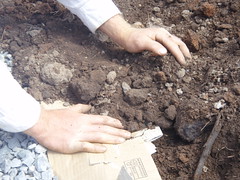
The cardboard is used as a biodegradable weed barrier at the edge of the garden pathways. Persistent weed problems always occur at the edges, like the base of a fence post or crack in the sidewalk. The buried cardboard will prevent weeds for several weeks, but not permanently. It is important to plant something in this part of the bed soon. Pennyroyal is a favorite for its pleasing smell and ability to distract pests.


Finished
Originally uploaded by tlbaraka
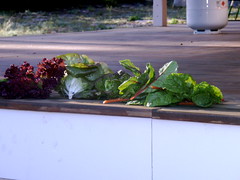
There it is!!! The completed garden. We are very happy with our effort and persistence and the garden is going to be very productive in the future. All we need now is a few thousand plants!

Tuesday, October 23, 2007

Where some of our food comes from

For the past few weeks, here at Rivertree, Jesse and I have been working really hard on puttting in part of a permanent food production system (big garden) that has taken much of our energy. During this process, which is near completion, we have had lots of opportunities to practice skills in growing and catching our own food. It can be a bit of work ,in the begining, learning how to eat really well but for us there is no better feeling than knowing where our food comes from. Our dream, is that one day we have an established living system, outside our home, that provides us with all of our most basic needs. For now we settle for whatever we can get.

The following is a summary of our efforts at outsourcing the grocery store in the past weeks. It hasn't been all that much so far but the potatoes are coming along and new veggies are planted everyday. Jesse spends about 4-8 hours a week in the garden which, he claims it's the best part of his day.

WARNING FOR PEOPLE WHO DON'T EAT ANY MEAT THERE ARE PICTURES OF BUTCHERING.


Originally uploaded by tlbaraka
Jesse's first rabbit caught using a wire trap that goes over the head when they come out of the hole. They are a many, and we like to eat meat so it is a useful experience in learning to catch them. As a young boy Jesse's Grandfather taught him catch gofers using a wire trap. The wire trap is a low cost low effort technology and a dozen traps can be set in less than half an hour. With a quick check a couple times a day there are no guns and no sitting and waiting.


seasoned and ready for the oven
Originally uploaded by tlbaraka
The rabbit turned out really well. It was totally free tasty and healthy. We have not tried to catch another since, as we have had a freezer full of kangaroo meat.


Originally uploaded by tlbaraka
One morning while Jesse and Freddy were driving home they hit a Roo or Walabee?? We call him a Roo. You really have to pay attention out here when you drive because the Roos cross the road in front of you very suddenly. Usually it is impossible or dangerous to stop. Most people have a large bar across the front of the vehicle in order to deal with this situation and it is very common where we are to see dead Roos on he side of the road because sometimes they are really big.

The Roo was still alive with both or one of the legs broken. Jesse did the best he could to bring the animal to peace quickly. Leaving Roo on the side of the road to rot was not an option (although you drive by a lot of that) because he was not too banged up so definitely edible. This is Jesse and Fredrik tying up Roo, like we had seen in pictures on the net.


Skinning/Gutting
Originally uploaded by tlbaraka
It is what it is...skinnig and gutting. They are doing the best they can, because neither has worked with a large carcass before. They mention that having the experience with the rabbit, also a first, helped. Baby steps!!!


Gutting
Originally uploaded by tlbaraka
Figuring out where or how to take the guts out was interesting....but it all fell out in the end. I think at this point they were trying not to hit the bladder. This was really hard to watch. however, it was really important to participate as much as I was capable. Having this intimate connection with my future food was a new and difficult experience for me but I feel lucky to have had an opportunity to learn.


Butchering
Originally uploaded by tlbaraka
Jesse and Freddy trying to work it all out and I am on the sidelines with a piece of paper from the interent helping them find the different cuts on the carcass. In the end they improvised.


Good Cuts
Originally uploaded by tlbaraka
We were not sure how to butcher up the meat and the directions from the internet weren't really helping out so Freddy and Jesse cut what they thought was edible nice undamaged meat. We all thought it looked like stuff we had seen at one point in life and then we proceeded to wash and freeze it. We covered all the meat in olive oil and lemon juice then packaged for use in future meals. The meat was still really warm when I was handling it and I felt a little strange about it. I also felt pretty excited when I thought about how healthy and beautiful the meat looked. This meat has given us great tasty dinners such as two very good stews, tacos, sheppards pie, steaks and given much to cutting meat costs. We find it is best in a stew or simmered for a while for flavor and tenderness.


Dinner
Originally uploaded by tlbaraka
This is all the meat together before we separated it and it is quite a bit of food. We have not hit a Roo since and definitely work to avoid it, but if it happens again this is what we will do. It was really hard the first time, because we had no previous experience.


This is the garden at the front of the house we are living in, it is only a temporary living quarters, as we wait for the house on the land to be completed. When we arrived, the garden was mosty "weeds" some lavader bushes and a few agapanthus plants. The soil was a sad sight of decade granite sand. The house at the land was still months from completion and no location had yet been selected for the garden. We could not really say that we where pursuing permaculture without a veggi garden. We planned to make this little dust hole into our garden straight away. Jesse has done a couple gardens in the past and I have had little experience with any and this looked like a real challenge. Nothing like the rich black soils of the Fraser Valley.


Jesse did a fantastic job in coverting our dry little sandy space into a productive plethora of greens to eat. It is challenging with, little water and basically sand as your soil. Heavy mulching was required and regular fertilizing with a diluted manure tea. The garden has required a modest level of outside resource, but we need a quick result at this temporary location. He did a really good job and at this point we don't need to buy too many greens. With three people to feed it takes a bit of time and practice to get it right. The price of vegi's is a lot higher here than back home, but the most important thing is that we are getting nutrition not normally found in store bought veggies. We have heard that the sure fire best way to live a long and health life is to eat as much food from your yard as possible.


We put all the food out to give an idea of what we are able to harvest from the garden on a regular basis. It is not an everyday thing but a few times a week we can have a really nice salad with heaps of goodness. This is chard, three types of letucce, beet tops, cabbage and broccoli leaves, dill, basil and sage. Tasty treat!!


Off to catch breakfast
Originally uploaded by tlbaraka
Whenever we have had a couple of days off we have taken the opportunity to go to the coast and do some surf fishing. It is a lot differrent than any kind of fishing we have back home and a bit of relax vacation time from the farm.
Whiting are one of the fish that you can catch at this time of year as well as bream and flatheads. Compared to fish caught commercial offshore these fish are extremly low effort sources of protein. We are told by locals that winter is the main fishing season and we are at the beginnning of spring heading into summer. They are still around but it takes a bit more time, standing on the beach. Well worth the wait though, this morning Jesse caught two Whiting that were as awesome tasting as any we have had. Other than bait and a licence (which are both cheap )you can fish to your hearts content. The only thing you have to look out for is the sun because if you are out there all day it can take its toll.


Just want to highlight the website http://www.pfaf.org/ fantastic resource for some quality info about plants...permaculture perspective of course.

Sunday, October 7, 2007

River Tree Gabion and Swale Design


Gabion System
Originally uploaded by tlbaraka
At the top of the picture is me (Jesse). To the right of me is a culvert that runs under the main driveway. In a heavy storm a significant amount of rain water can be expect to coming rushing out of that culvert.

The assembly of small rock walls coming to the foreground is a gabion system that Tanya and I designed and constructed using rocks from the site.

Without the gabions, water would likely rush down hill causing erosion and damage to the surrounding area. With the gabions in place water is slowed and soaked into the soil giving us an opportunity to assemble a productive ecosystem of useful plants.

Gabions first slow the water down and secondly collect sediment and other materials behind them. The top edge of the gabion is roughly level from end to end, pacifiying the flow of water down hill. As material builds up behind the gabion, a level area of moist soil is built up. This becomes an excellent area for growing plants.

Gabions are a desing feature often used in deserts, fequently measureing meters in height. In this case a smaller scaled down version is most appropriate.


Survey stakes for swale
Originally uploaded by tlbaraka
Little more than sticks in the ground these are the survey markers of a swale that Tanya, Fredrik and I have designed here at River Tree. It follows a contour line from the bottom of the gabion system over 200m to the edge of the property.

A swale is an on contour water harvesting foresty system. Swales intercept and hold water running down slope. Once in a swale water has an opportunity to soak into the soil and move into the root zones of the plants in the swale mound and in pastures below.


Tanya checking her level
Originally uploaded by tlbaraka
This is Tanya using the laser level to check that the swale is not falling or rising too much. Differnces off dead level within 20mm or so are acceptable. This kind of variation will self level over time.

The laser level is a great tool, as it requires only one person to use efficiently. However, the laser level is battery operated and cannot be looked through like a dumpy (transit) level.


Tanya digging the swale
Originally uploaded by tlbaraka
After she has checked her work it's back on the machine to further demonstrate her proficiency.


Leveling out the swale
Originally uploaded by tlbaraka
Lucky me, taking this picture from the machine, as Tanya toils away to fix my mistakes. A professional operator would do such an accurate job that this hand work leveling would not be required.


The level sill spill way
Originally uploaded by tlbaraka
The gap in the swale mound (center of picture) is the level sill spill way for our swale. This is a very important feature of any swale and must be constructed with great care. As Tanya, Fedrik and I are all new at operating the machine, we opted to use hand tools for this job. The edge of the level sill was set at 10 cm above the bottom of the swale, using the laser level. This means that the swale will fill, to a depth of 10cm along its entire 200 meters, before the excess spills over the level sill. When the water does spill over it will do so evenly without causing much erosion or damage to the slope below.


The tree that had to go
Originally uploaded by tlbaraka
Unfornuately a medium sized tree had to be removed, as it was growing on the conture line of the swale. This was my first time taking down a tree with the machine and I did it safely. The useable parts of the tree will be milled into fence posts, and the remainder will be fuel and mulch wood.

There's me, taking a break on the batter (up slope edge) of the swale. This part of the swale is usually graded at 2:1. We did this work by hand, hence the resting. Across the bottom of the swale is dead level and is flexible in its width. We designed this one to be used as a track for an ATV or small tractor. The wider the swale the more water it can hold. The bottom of the swale can become quite compacted over time. The hump of the swale is made of the material removed from the slope in creating the level track. The size of the mound is dependent on the slope of the hill and the width of the swale. A swale mound is never compacted, hooved animals and machines must never be allowed onto a swale mound or it will not be able to soak up water. Planting is also another important aspect of a swale. In the application of permaculture design a swale will have trees planted in the mound.

For now we have seeded this swale heavily with 5 different legume seeds: clover, lucerne (alf alfa), vetch, peas, and lupin. We made sure that all seeds were innoculated with the appropriate nitrogen fixing bacteria and then they were well raked in. Its an experiment! In about a months time we will begin to plant trees into the swale mound. We do not have the trees, or we would have planted now.

Fortunately for us, we have access to water that can be used to flood our swale. A dam on the property is going to be cleaned out and the water level must be lowered. Rather than wasting the water we can pump it up hill to the culvert above the gabion system and use it to flood the swale. This picture shows the water moving down the gabion towards the swale in the back ground. In most situations we would have to wait for rain to soak the swale. By pumping water now, we can help to germinate all the seeds we have put on the swale and prepare it for trees in the coming weeks.


Flooding finished swale
Originally uploaded by tlbaraka
After the water has moved through the gabion system it enters the swale. Remember that a swale is on level. The water moves along the swale realatively harmlessly, like a spilt drink across a table, spreading equally in all directions. Erosion is not a concern in a swale. The only time a swale can be damaged is if it overflows its bank. That won't happen to ours, because we did such a good job on the level sill spill way. That's Fredrik in the picture looking quite proud of the job we have done. We all watch the water move along the swale until the sun went down.


Flooded swale
Originally uploaded by tlbaraka
There it is, our first swale seeded flooded and ready for action! All we need now is some rain and we won't require the pumped water any more. Notice in the middle of the picture that water has already saturated the swale mound and is now leaking through onto the grass down slope. Unfortunately this area is badly compacted and the water is not saoking as it should. Once we have the right equipment we will deep rip this area. Deep ripping opens compacted land and the water that soaks through the swale will move into the soil and not run across the surface. The best place to have water on a farm is the root zone of the plants!

Monday, September 17, 2007

Transition to Australia

This is the first of what we hope will be many posts chronicalling our pursuite of Permaculture. We do not claim to be experts on Permaculture and we have yet to teach a course. This is why we have choosen 'pursuing permaculture', for us this title represents a constant state of learning and exploration. We have heard it stated; that the futher one moves down the path of Permaculture the less one truly understands the details of Permaculture. A little bit cliche but it works.

From here on out to the end of our lives we are committed to providing an ever growing amount of our needs in a way that enriches, rather than destroys, the living systems of the planet. We are also committed to sharing in this experience with any others who are interested.

For us, Permaculture is a multidimensional perspective rather than a specific technique or strategy. Coming from a Permaculture perspective it is possible to work around any adverse conditions and achieve human needs while enriching the global ecosystems.

Australia is the birthplace of the Permaculture movement and after careful research decided that this would be the best place to learn. With careful management of our limited financial resources we sent Jesse on a two month trip to Australia in late 2006. While in Australia, Jesse attended two different Permaculture Designing Courses, one taught be Geoff Lawton and one taught by Bill Molison and Geoff Lawton. In between he spent several weeks training at the Permaculture Research Institute in sub-tropical New South Wales. At the end of his trip he was offered an opportunity to help with the design and implemtation of 480 acre system in September 2007.

The Plan...

Buy two plane tickets for Australia. Pack away and give away all of our unnessceary worldy possesions. Leave our two great jobs, loved ones, and everything familiar behind for a six month volunteer positions on the other side of the world. Cross our fingers and hope for the best!


The last few days before we left on our journey to purse permaculture in Australia were very busy, but we were able to squeeze in a nice evening with some great friends. The support that we received was such a boost to both of our spirits considering the huge leap we were making. Words could never express what the support of friends and family has meant to us. We know that we have made the right choice but it is not enough just to know, without the support we could not feel that this was right.


Life was really full-on in the days leading up to our departure. We were Pretty tired and nervous by this point but we managed to pull it together and spiffy up. Unsure of what was to come, we flew out on the 27th of September and landed in Australia on the 29th. We lost a whole two days and it is a wierd thing flying so far. It is almost as if you don't really exist during the flight and also a bit of a time warp.

In Australia...

Fredrik picked us up from the airport and took us straight to the land. The care and cultivation of this land will consume most of our efforts in the next six months.


We used an ATV to cover all 500 acres. We caught a glimpse or two of some Roos but they were to quick for my camera.


Jesse and Fredrik looking at one of the dams on site. Most of the earth works on site are going to need some repair. Jesse was feeling really overwhelmed at this point, 500 acres is a lot of land to try and envision especially after the flight. Most of our work will be concentrated on a small segment of the land near the new house site.

My PDC at the Permaculture Research Institute...

Three days after our arrival I went to the PRI and attended a 2 week PDC course, with Geoff Lawton. It was a lot of information to take in but I felt that it was the perfect length of time for me. I feel inspired to test all that I have learned but nervous too. After the PDC there was a dam and swale system being built at one of Geoff's student's place in Woolgoolga, NSW. Jesse, Fredrick and I went to watch and help. It was an extremly useful experience to be involved in. We got an opportunity to observe Geoff giving a consultation and to help with some of the surveying for the earth works. It took almost two full days to clear the site and dig the dam. We couldn't really help with the construction because there are certain things only a machine can do, not much need for muscle power during our time there. A fellow named EJ and his family are in possession of this land and have decided to take more resonsiblity for the food they eat. In order to have a food forest and increase the food they produce more water is needed. Hence the dam.


Geoff (Left) talking with EJ (right) about his vision and future plans for the site. EJ is trying to move away from working at his job and concentrate his time on growing for his family, using their six acre block of sub-tropical land. This earthworks project is his families big leap. EJ was really excited and happy about the whole thing. It was a great experince to give support to EJ and his family as they work towards their dreams.


The earth mover (in the distance) has arrived and Geoff is giving him directions on what will happen. You can see the dam area staked out in this picture. Most of the people in view are students from my PDC here to help and learn.


Jesse standing in the bottom of the completed dam. It is over 4m deep in the middle aproximatley 400,000l in capacity, and took a 15ton excavator 18 hours to complete. Once it is filled with rain water and had a season or two worth of growth it will be a beautiful little spot for EJ and his family. It is possible for an experineced aquaculturalist to grow 1kg of fish per litre of water at any given time. EJ could easily produce 100 kg of fish protien a year with this dam.